Product Release Version: v25.2.0
November 2024 Product Release
© 2024 Practice Management System
Disclaimer: All rights are reserved. No part of this work may be reproduced in any form or by any means graphic, electronic, or mechanical, including photocopy, recording, or information storage and retrieval systems – without written permission of the publisher.
The products that are referred to in this document may be either trademarks and/or registered trademarks of the respective owners. The publisher and the author do not claim these trademarks.
While every precaution has been taken in the preparation of this document, the publisher and the author assume no responsibility for errors or omissions or for damages resulting from the use of the information contained in this document or from the use of programs and source code that may accompany it. In no event shall the publisher and the author be liable for any loss of profit or any other commercial damage caused or alleged to have been caused directly or indirectly by this document.
Printed November 2024 at PracticeSuite, Inc.
Part 1- Product Enhancements
Practice Management
1.1 Referral Management
The referral management module has been further enhanced with additional features and functionalities. The following are the new changes made to it.
A. Appointments: Users can now add new and follow-up appointments from the referral screen. To add a follow-up appointment, the chart should have originated via an appointment. If no appointment is associated with the chart, the ‘Follow-Up Appointment’ option will not be available.
To schedule an appointment, click on the ellipsis at the right end of the referral listing. Please refer to Image 1.1a.
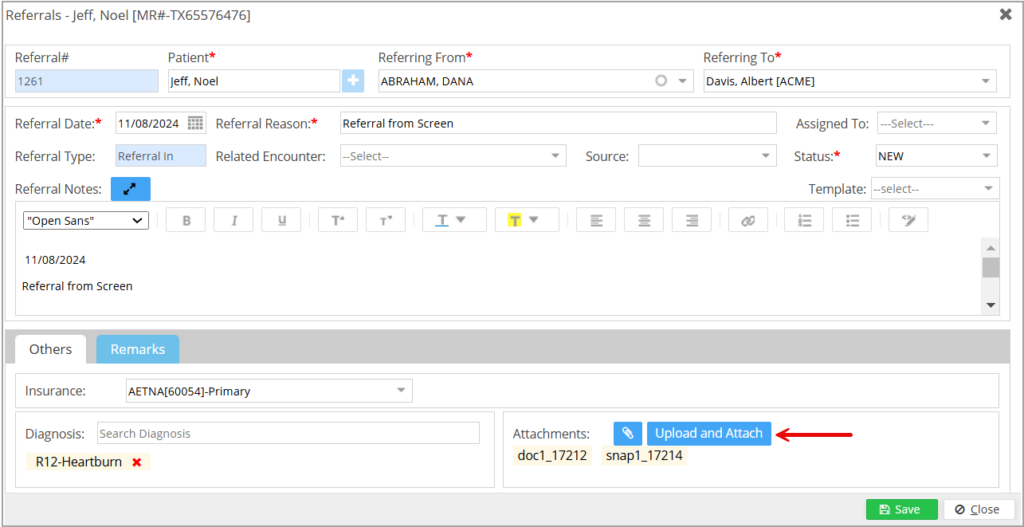
B. Upload Documents: Users can directly upload documents from the referral screen. All the uploaded documents are automatically attached to the referral (see Image 1.1b).
C. Provider’s Signature: Users can add the provider’s signature to referral letters. Use the tag #@PROVIDER_SIGNATURE#@ to populate the provider’s signature.
1.2 Work Queue Enhancements
The Work Queue’s appearance and feel have undergone a few major changes in this edition.
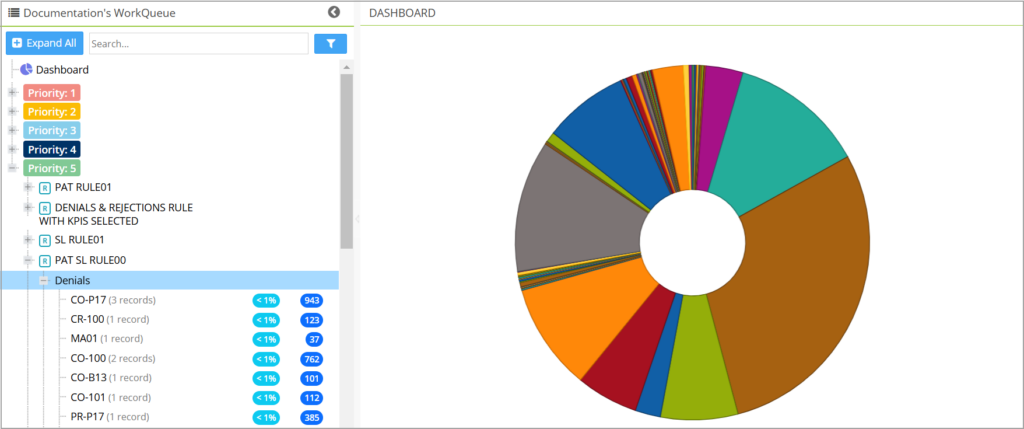
A. The Work Queue now includes expanded search filters, with nearly all the filters in Collections Manager being made available in the module (refer to Image 1.2a). Users can access these filters by clicking the filter icon ![]() next to the search field, which opens the full range of Work Queue search options. This enables more precise and efficient search functionality within the Work Queue.
next to the search field, which opens the full range of Work Queue search options. This enables more precise and efficient search functionality within the Work Queue.
B. The Work Queue has been updated to restrict users to viewing only their assigned worklists, ensuring the worklists remain private and maintaining focus and attention to their tasks. Users are restricted from accessing other users’ worklists. However, supervisors (Level-1 and Level-2, as set on the Teams page) retain visibility of the overall user’s tasks and have access to the Assigned To filter and can view other’s tasks.
C. The Unallocated and Need More Info Queue lists will only appear if the user selects the Show Unallocated checkbox under the More Filters section.
D. An instant quick search box has been added to the left pane, allowing users to easily type keywords to search for rules, worklists, and other items. The search results are organized and displayed under their respective headings, making it quick and convenient to locate specific items.
E. The priority headers on the left-side pane will have colored badges corresponding to their priority and this visual enhancement makes it easier for users to identify and respond to high-priority items at a glance. The priorities will have the following color codes: Priority 1: Red 2: Orange 3: Blue 4: Dark Blue and 5: Green.
F. Rule headings will be prefixed with ![]() .
.
G. The left pane can be hidden by clicking ![]() on the header. Additionally, an expand and collapse option has been provided for all the levels in the tree structure, including a ‘Collapse All’ at the top.
on the header. Additionally, an expand and collapse option has been provided for all the levels in the tree structure, including a ‘Collapse All’ at the top.
H. To clearly distinguish between line status and sub-status, items with a status of HOLD will now be prefixed with Line Status, while line sub-statuses starting with HOLD_**** will be prefixed with Line Sub Status.
1.3 Charges and Claims
1.3.1 Claim Batch Generation
An internal modification has been made to include service location as a criterion in the claims batching process. The grouping was previously restricted to LE, Receiver, and Insurance.
This change has been made to align with the requirement of certain payers to have certain service location-based segments appear in the electronic claim headers. This is an internal change and does not impact the user experience.
1.3.2 Status Change from HOLD
Charges can now be moved from HOLD status to any other line status, enhancing flexibility in charge management. Previously, charges in HOLD status could only be reinstated to the line status they were in before they were changed to hold status. This applies to charges updated from X-Superbill, Charge Master, and Claims Workbench.
1.3.3 Claim Validation
1.3.4 EDI Claim- Send Admission Date for POS 32
1.4 X-Superbill
1.4.1 X-Superbill Automation Based on Eligibility
A setting has been made available to enforce eligibility prechecks for automated charge processing. A new checkbox named Auto-Process Charges Only if Eligibility is Verified has been added under the billing options. The setting enforces the system to auto-process the charges with an eligibility status response, leaving those without them. If the setting is not enabled, the system processes all the charges regardless of the eligibility status.
Additionally, the length of the field Exclude CPT Code has been increased for improved usability.
1.4.2 New HOLD Bucket for Eligibility
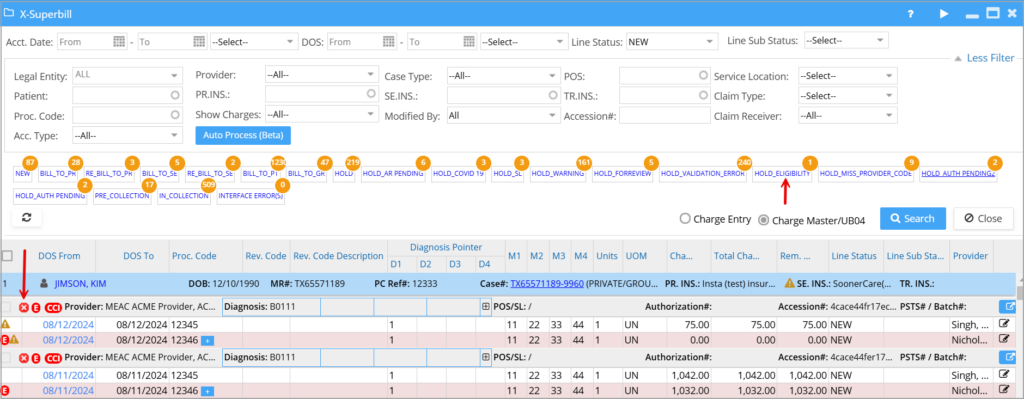
The charges errored in the eligibility verification cycle will automatically move into a bucket named HOLD_ELIGIBILITY. The line sub status of the affected charges will change to HOLD_ELIGIBILITY and remain with the line sub status until either manually cleared or when a successful response is received in the subsequent eligibility cycle.
Additionally, on the X-Superbill listing screen, the errored charges will have a red x, and the error-free charges will display a green check.
1.4.3 Charges Import- Wizard Implementation Complete
The bulk charge upload wizard for the import of charges using CSV file(s) has been fully implemented. Akin to the fee schedule import, the charge import also follows a two-step process:
1. The first step is for the user to upload the system-compatible CSV file.
2. Once uploaded, the user can custom map the fields in the file to the corresponding fields in the system.
1.5 Payment Master-EOB Attach
Henceforth, users can attach an EOB file to a payment even if the payment falls in a closed accounting period. This change applies to both fully applied and partially applied payments.
General
1.6 Access Permission Setup at Practice Level
The new software update introduces a new practice-level parameter for regulating IP permissions. The setting allows the practice’s administrators to input individual IP addresses or a range of addresses. The new field, Practice Allowed IP/IP Range, is available in the Preferences screen as in Image 1.6a.
Administrators can enter a single, multiple (separated by commas), or a range of IPs. For example, to enter an IP range starting from 192.168.0.1 to 192.168.0.100, enter it in the format 192.168.0.1/100.
The remote access control screen within the user’s setup now includes an IP Range Alias drop-down menu (refer to Image 1.6b). Selecting PRACTICE_ALLOWED_IP_RANGE applies practice-level IP permissions to the user. Choosing Select Range allows users to specify specific IP addresses in the Public IP Address field as earlier.
If this field is left empty, the user will have unrestricted access from any IP address.
1.7 2FA- Facility to Skip 2FA on a Device
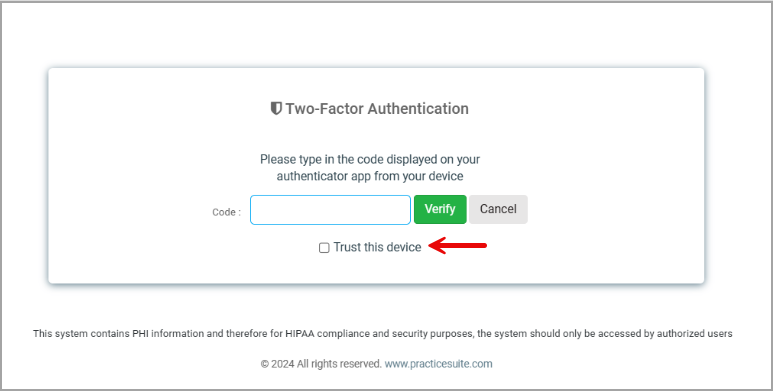
Once the two-factor authentication (2FA) is enabled for a device by the user, the user can choose to skip the prompts for future logins from the same device. A checkbox labeled Trust this device is included in the popup, permitting access from the device for future logins without requiring secondary authentication. Please refer to Image 1.7.
2FA authentication that was previously available for individual logins has been made available for group/single sign-on logins with this release. The grace period to skip 2FA for an SSO user is preset to 15 days.
1.8 Patient Demographics: Import Patient Data CSV
Similar to the recently released charge CSV upload, a similar feature for the patient demographics import has been made available with this release and has a two-step process.
Step 1: In the first step, the user is prompted to upload the system-compatible demo CSV file.
Step 2: The user is then prompted to map the fields in the file to the corresponding fields in the system.
Once the fields are mapped, the user can click on ‘Import’ to have the data imported into the system. The system will display a confirmation message with the number of records uploaded.
1.9 Document Scanner
When using the scanner application within the Document Manager to scan new documents, the most recently used scanner will automatically default for the scanning.
1.10 ICD Repository Updated
The ICD repository has been updated with the latest codes effective from October 1st, 2024.
Reports
1.11 New Aging Report – ‘D16. Detailed- Patient Aging Report’
A new detailed patient aging report containing patient and encounter information has been added to Report Central and is named ‘D16. Detailed-Patient Aging Report’.
* The offline reporting feature is available for the D16 report.
* Available Search Filters are Patient, LE, Provider, Aging Bucket, Statement Count, Patient Account Type, and Case Type.
| Key Columns in the D16 Report | |
| RP Code (Rendering provider code) | Last User Activity By |
| DOS | Last User Activity Date |
| POS (Place of Service) | Last User Activity Note |
| Service Location | Last Follow-Up User |
| Claim Date | Last Follow-Up Date |
| Claim # | Last Follow-Up Notes |
| Procedure Code | |
| D1, D2, D3, D4 (Diagnoses codes) | |
| Charge | |
| Line Status | |
| Balance | |
| Payor Remark | |
| Last Statement # | |
| Age since Last Statement | |
| Aging Since DOS | |
| Aging Since Claim Date |
1.12 A/R Days – Patient Aging Reports
The following reports have been updated and will reflect the patient aging based on the patient’s a/r date (the date the encounter line was moved to the patient responsibility status) instead of the DOS or the claim date.
D3. Summary-Patient/Guarantor Balance and Aging Report
D4. Insurance Balance and Aging by Patient Report
D7. Accounts Receivable Aging Report
D8. Provider Wise A/R Aging Report
D11. Aged AR (Insurance and Patient) by Patient Report
D12. Aged A/R (Ins. and Patient) by Payer Report
D13. Service Location Wise A/R Aging Report
J28. Procedure Aging by Financial Class
Part 2: Resolved Items
2.1 X-Superbill Alert
2.2 Patient Portal Payments- Service Location Info
When payments were made through the patient portal they failed to reflect the service location. This has been resolved.
2.3 J1 Report Performance
The performance issue reported for ‘J1. System Financial Summary Report’ has been resolved.


