Practice Management System
Release Note
Product Release Version: 19.9.0
Product Release Date: Aug 2021
© 2021 Practice Management System
Disclaimer: All rights are reserved. No part of this work may be reproduced in any form or by any means through graphic, electronic, or mechanical, including photocopy, recording, or information storage and retrieval systems – without written permission of the publisher.
The products that are referred to in this document may be either trademarks and/or registered trademarks of the respective owners. The publisher and the author make no claim to these trademarks.
While every precaution has been taken in the preparation of this document, the publisher and the author assume no responsibility for errors or omissions, or for damages resulting from the use of information contained in this document or from the use of programs and source code that may accompany it. In no event shall the publisher and the author be liable for any loss of profit or any other commercial damage caused or alleged to have been caused directly or indirectly by this document.
Printed Aug 2021 at PracticeSuite, Inc.3206 Cove Bend Dr Suite A Tampa FL 33613
Part – 1 Enhancements
1.1 ERA- Refund Automation
1.1.1 ERA Recoupments
Practice Management System has rolled out a major enhancement in the ERA posting workflow by automating the refund/reversal posting.
A new checkbox “Process Refunds” is added to the ERA screen (see Image 1.1.1a) and when a user checks the option for posting, enables the automatic processing of refunds by the system. Though all refund scenarios may not be covered with this current automation, however, the most frequent scenarios are addressed with this release and are described below.
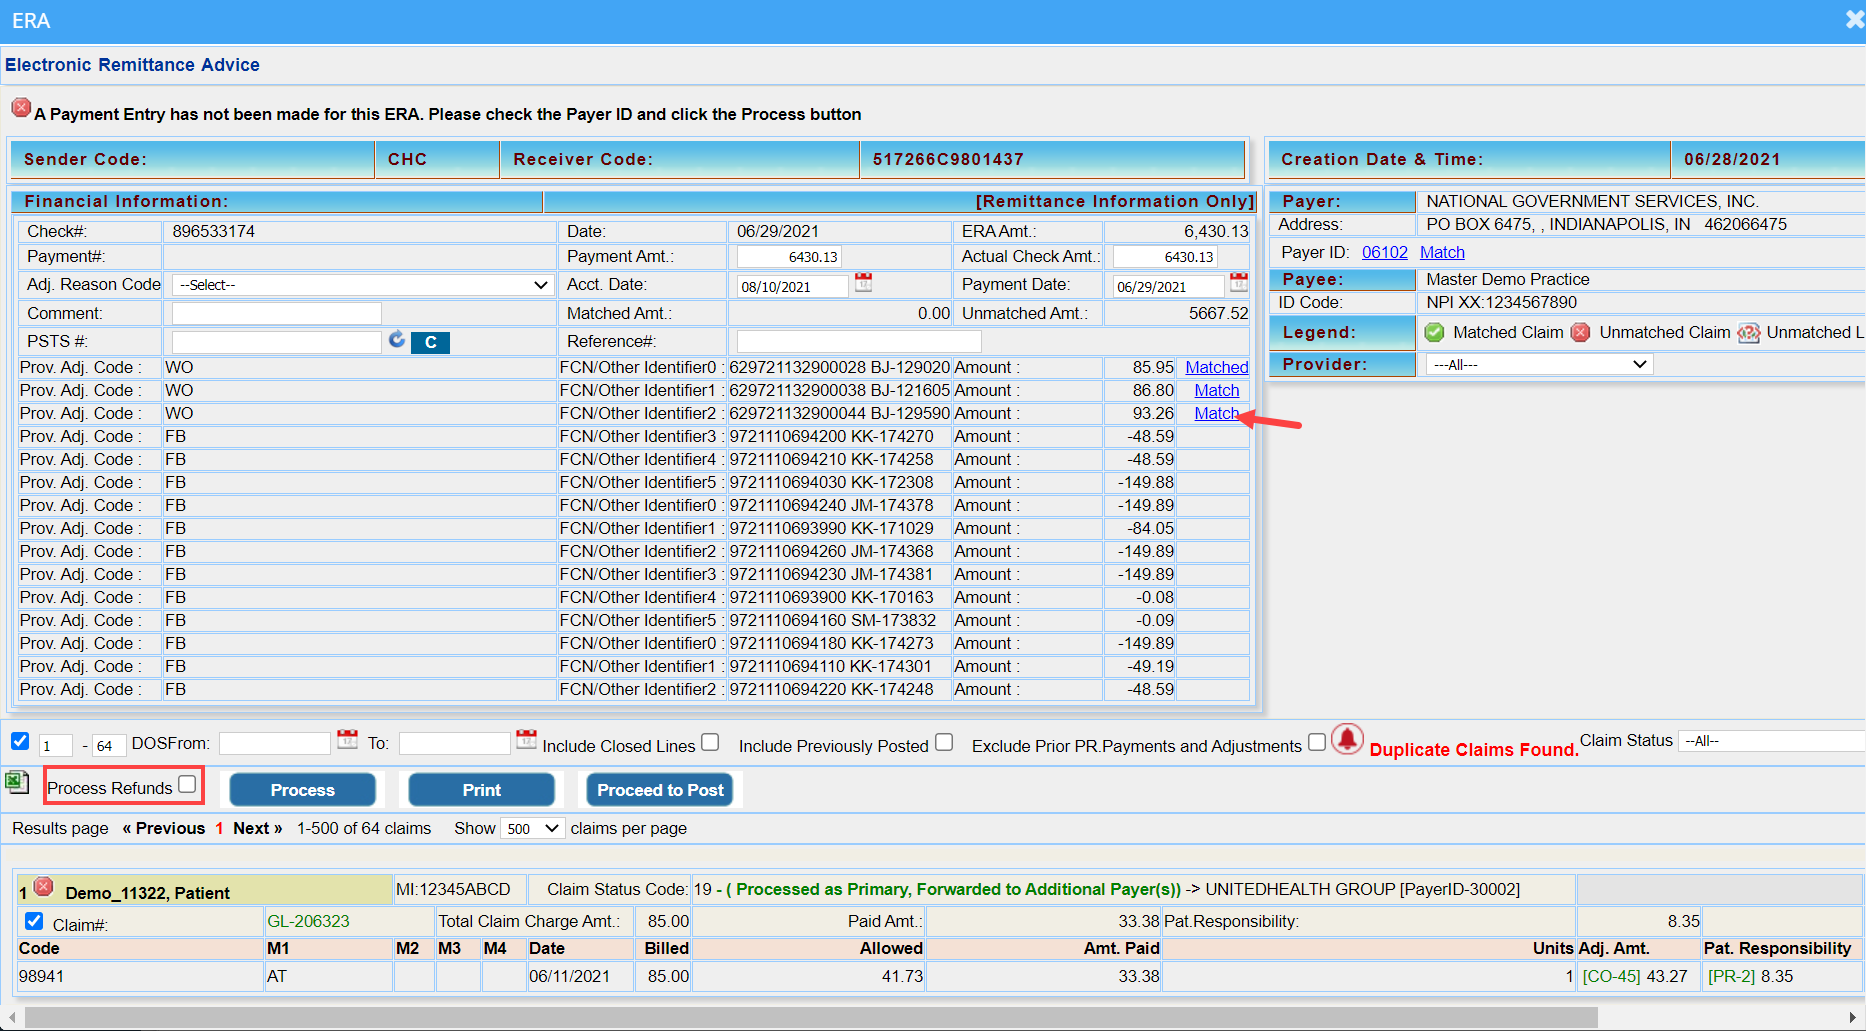
A. For the reversal for a claim specified in the PLB segment– The user will have to match the claim before checking the ‘Process Refunds’ check box and click on Process button.
A1.Click on ‘Match’ link provided beside the amount field(highlighted in Image 1.1.1a) in the PLB section to manually match the claim.
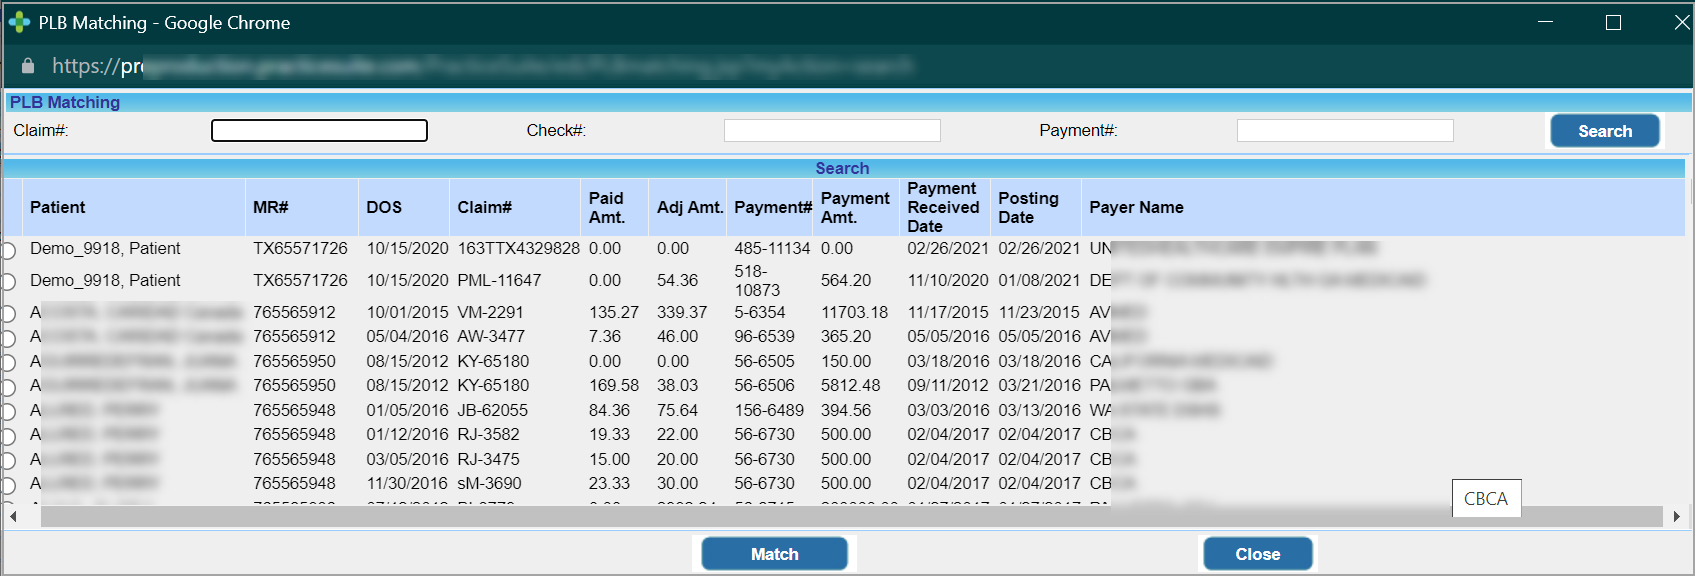
A2. PLB claim Matching screen pops up (Image 1.1.1b). Search filters are Claim #, Check# and Payment #. Search and identify the claim where the Paid Amount and Adjustment matches the one given in PLB. Click ‘Match’ Button at the bottom. Once matched, ‘Match’ link in the PLB section will change to ‘Matched’.
A3. When the ‘Process Refunds’ check box is checked and ‘Process’ button clicked, the ‘Match’ link in the PLB segment changes to tick mark ![]() if the refund works. A cross mark
if the refund works. A cross mark ![]() appears if refund fails-Also the ‘Match’ link will appear as ‘Matched’ which can be used to match it to another claim.
appears if refund fails-Also the ‘Match’ link will appear as ‘Matched’ which can be used to match it to another claim.
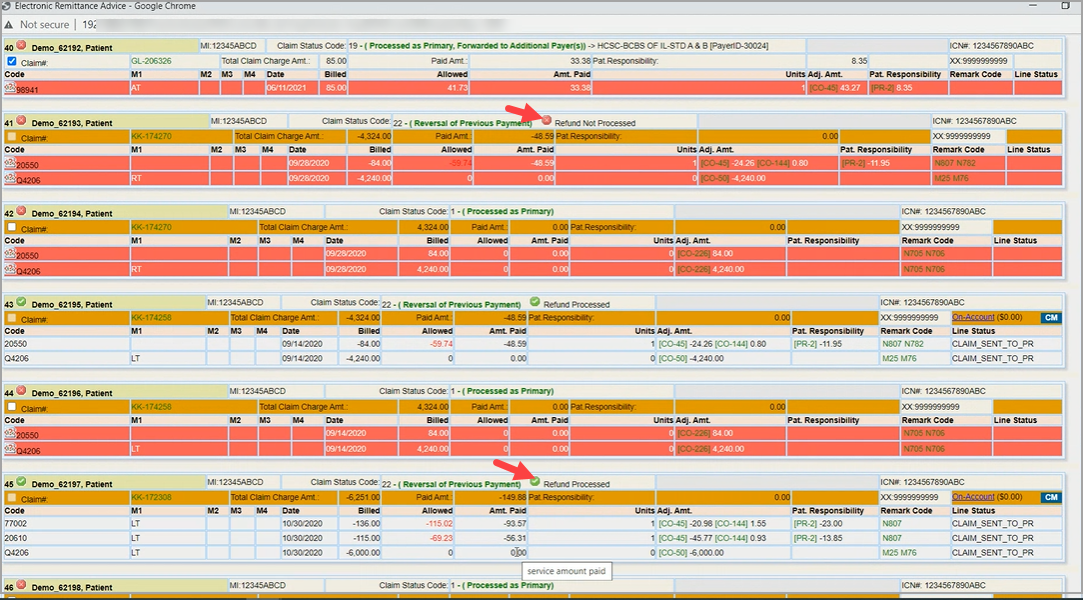
B. For the reversals for a claim in the same ERA with status code 22– check the ‘Process Refunds’ Check box and click on Process button.
B1. System will crosscheck whether it can find the exact match of Paid and Adjustment Amount specified in the claim with the paid and adj. amount in claims posted in the system. If found, it will refund the amount from the earlier posted claim to the current ERA. It will show a ![]() mark to show refund is a success and a
mark to show refund is a success and a ![]() mark if refund fails; see highlighted portions in Image 1.1.1c.
mark if refund fails; see highlighted portions in Image 1.1.1c.
1.1.2 ERA Auto Posting of Denial Remarks
When auto-posting denials in an ERA, the first payer remark code present is attached to the line if it is neither a contractual adj code (CO-45) or a patient responsibility code (PR-1, PR-2, and PR-3).
1.2 Auto Charge Credit Card for Installment Payments
This new feature in Practice Management System enables practices to accept recurring installment payments through credit cards.
- The Installment Screen now has a Setup Credit Card option to save credit card info as shown in Image 1.2a. Enter the credit card details and click the Save button on the installment screen after entering all mandatory fields to create the new plan. Please note that our system does not save any card info in its system and the information is stored in a tokenized form in the PCI compliant payment gateway system.

- For every successful payment:
a. A payment entry is created in Practice Management System and the installment count is increased by one. The installment status is now set as ‘Active’ by the system.
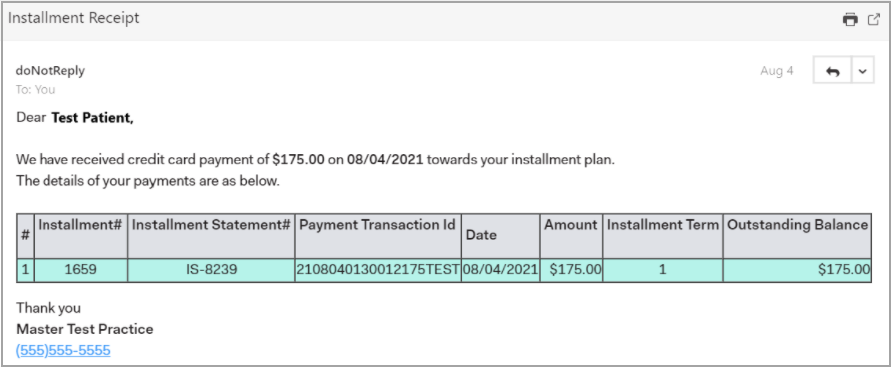
b. Email notification is sent to the patient; see Image 1.2b.
c. Successful payments get auto-posted to the encounters in the installment plan if the Auto-Post Patient Payments in the Billing options is enabled.
- For failed transactions:
a. The payment gateway will try to rerun the card the following day.
b. Installment status remains unchanged and the count is not incremented until the card is successfully charged.
- Once all installments are successfully processed, the installment status will be updated to status PAID when there is no outstanding line balance.
- If there are outstanding line balances, the installment status gets updated to Period Complete once the Installment period is complete.
- Installments can be pre-closed at any time.
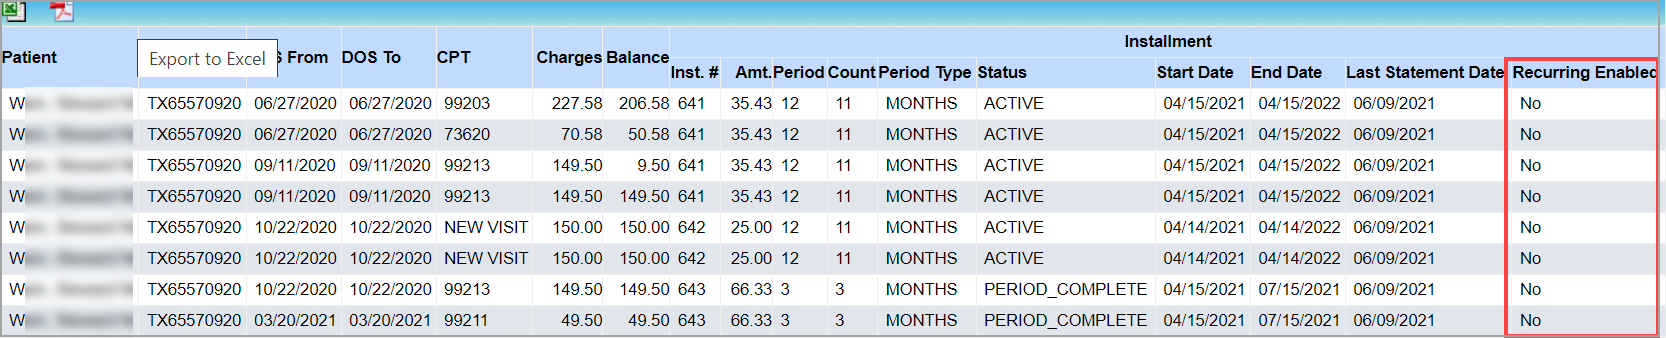
- New Column added to report C8. Installment Detailed Report to indicate if recurring option is enabled. The C9. Installment Statement Summary Report has four additional columns added to show Payment#, Gateway Transaction ID, Gateway Transaction Message, and Recurring Enabled. A sample C8 report is shown in Image 1.2c and C9 report in Image 1.2d.

Note: Practices with Payment gateway Enabled can use this feature.
1.3 X-Superbill
1.3.1 Users Can Bulk-Hold lines in the X-Superbill
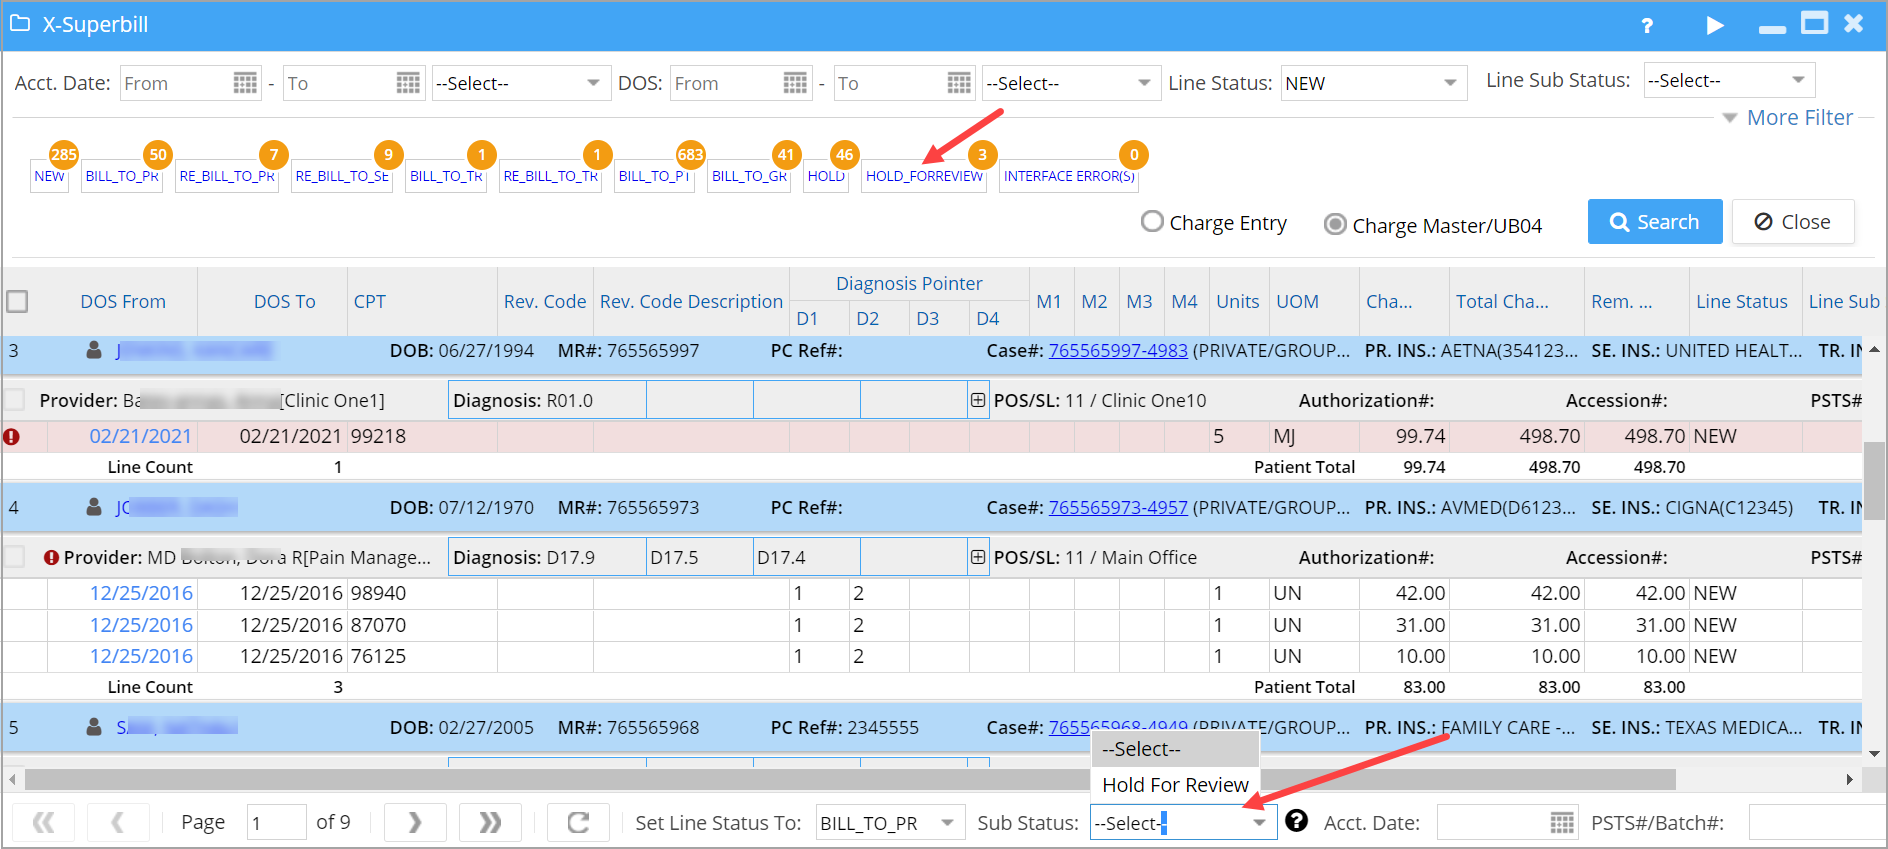
X-Superbill screen now has line sub-status for bulk Holding of lines (see Image 1.3.1). The created Sub statuses can be named with the Reason for holding the line.
A. To begin with, the sub status drop-down would be empty. Users can create HOLD_type sub statuses under the Advanced Setup-Billing Lookups page. A status with prefix HOLD_ will be treated as hold bucket and will be displayed in the X-Superbill sub status combo box. User can define multiple HOLD buckets (eg. HOLD_AUTH_PENDING, HOLD_REVIEW_PENDING).
B. Users can move selected claims to the HOLD sub status and clear off the HOLD sub status to push it back to their original bucket.
C. Lines with HOLD_type Sub Status will be excluded from claim generation in the Claims Workbench.
Image 1.3.1 Highlights HOLD_FORREVIEW bucket and the corresponding sub status drop-down.
1.3.2 X-Superbill Lines Can Be Moved in bulk To Other Statuses
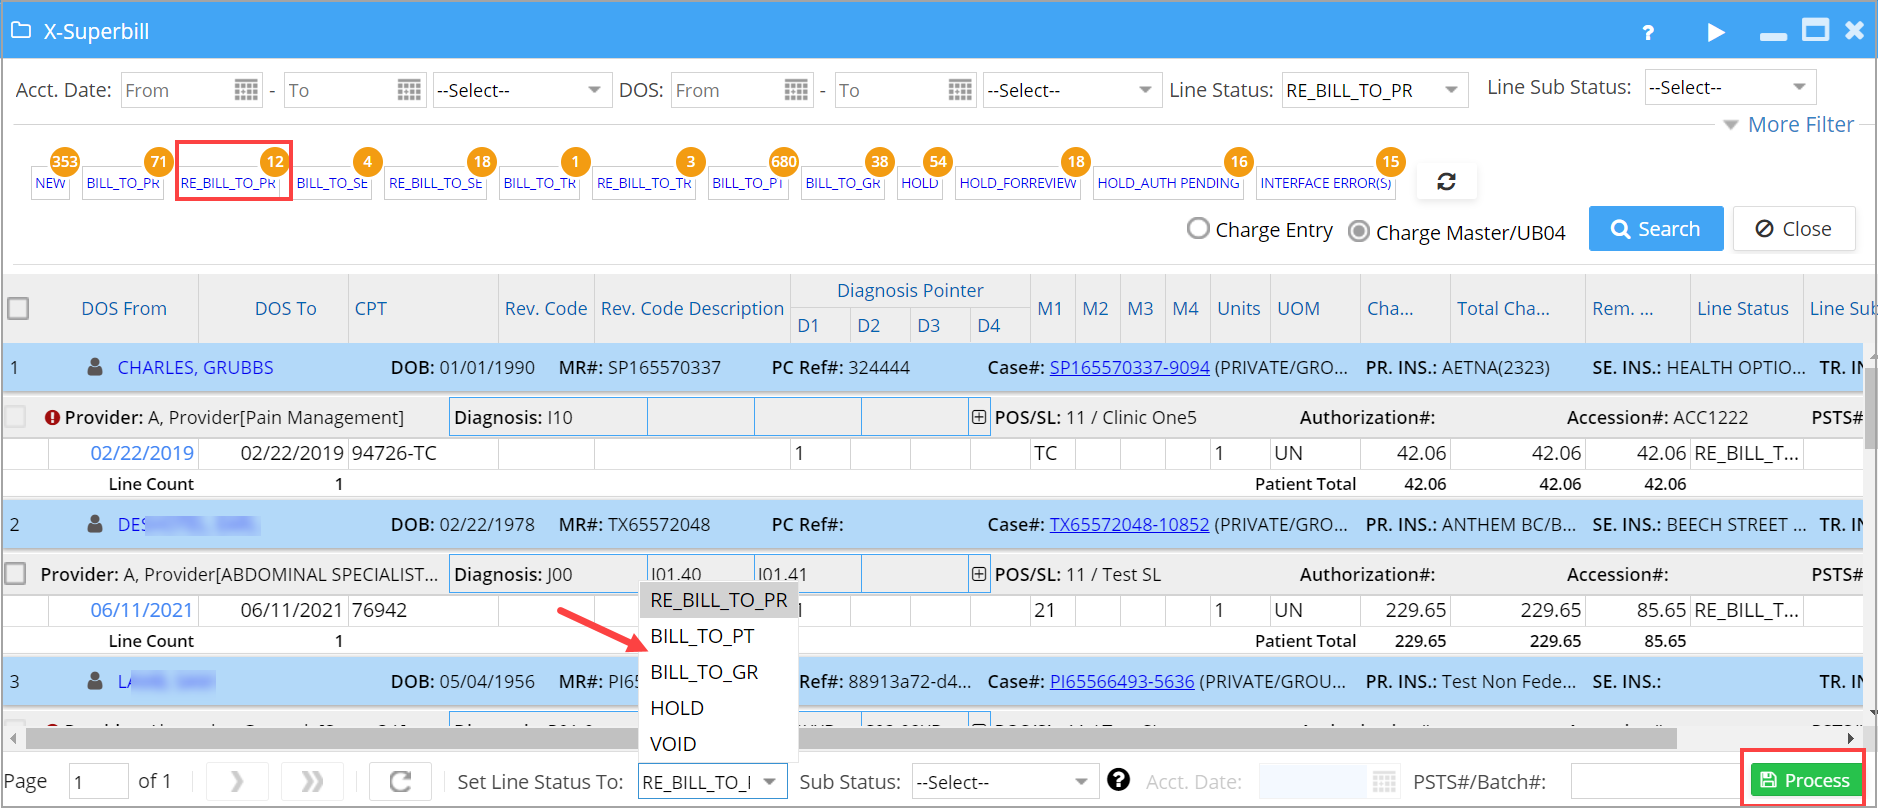
X-Superbill now permits bulk moving of lines in a given status to other permissible statuses which are valid transitions from the given one. BILL_TO PR lines can be moved to BILL_TO_PT, BILL_TO_GR, HOLD and VOID. Select the lines and then select appropriate status from the Status drop-down at the bottom and click on Process button; see Image 1.3.2 showing bulk status change of lines in Rebill_To_PR bucket.
1.3.3 Case Switch for Paid Encounters
X-Superbill Screen will permit case switching of paid encounters if the insurance/policy# and the insurance level in the original case match with the target case. In the previous release we had this feature implemented in the Case Setup screen.
To know more on X-Superbill, click here.
1.4 Claims Workbench
1.4.1 New Buckets to Place Claims with Hold_Type Sub Statuses
HOLD_Type substatuses created for the X_Superbill screen will also appear as separate buckets in the Hold section of Claims Workbench. Claims in these buckets will not be included during Claim generation. Refer to Image 1.4.1.

1.4.2. Additional Codes Added to the Clearinghouse Accepted List
To the existing clearinghouse accepted codes such as A0, A1, A2, and F0, further codes added. They are ’99’,’90’,’F1′,’F2′,’F3′,’F3F’,’F3N’,’F4′,’01’,’REG’,’P0′. Any other incoming status code will be moved to CH Rejected Bucket.
1.4.3 Rejection Codes in Claims Prioritized Over Accepted Codes
When clearinghouse provides two status codes on a single claim and if one of them is a rejection code, the claim will be sent to rejection bucket.
1.5 Patient Portal
1.5.1 Edit Button Removed for Consent Forms
Removed the Edit button in consent forms (introduced in Release 19.8.3). Restrictions put in place to avoid patients editing the consent form contents. Patients can view, sign and submit the form from the portal.
1.5.2 Printing the Consent Form is Now Patient’s Choice
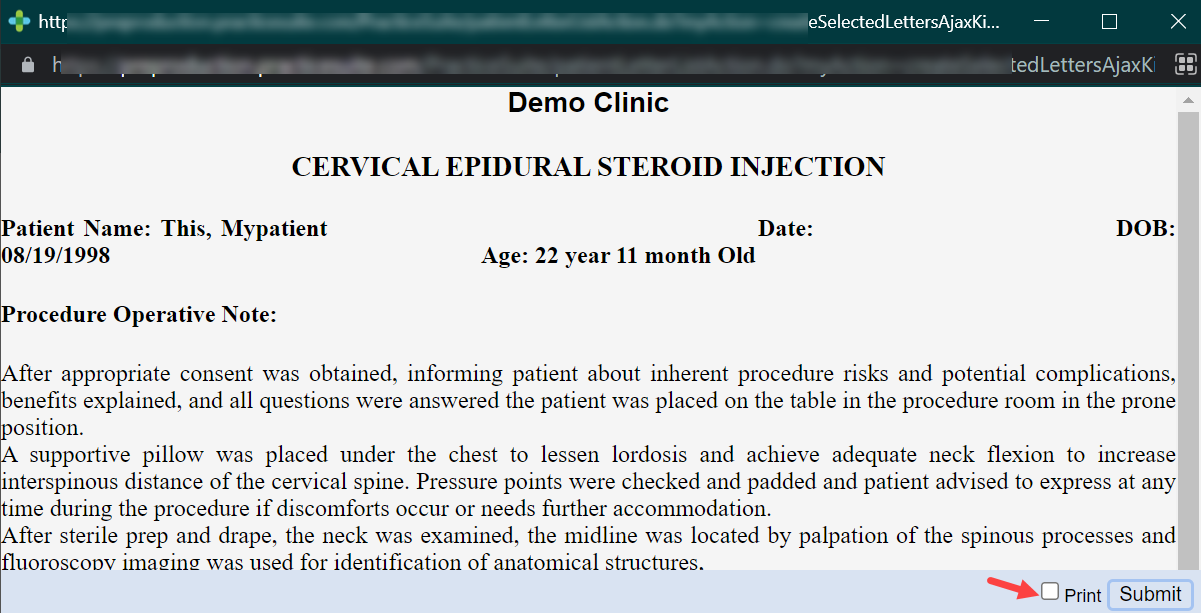
Patients can now choose whether or not to print the consent form while submitting. ‘Submit and Print Button’ is now ‘Submit’ button. ‘Print’ Check box is provided beside the ‘Submit’ button and is to be checked before clicking the Submit button to print the form; refer to Image 1.5.2.
1.5.3 Kiosk and Consent Forms Available at a Single location
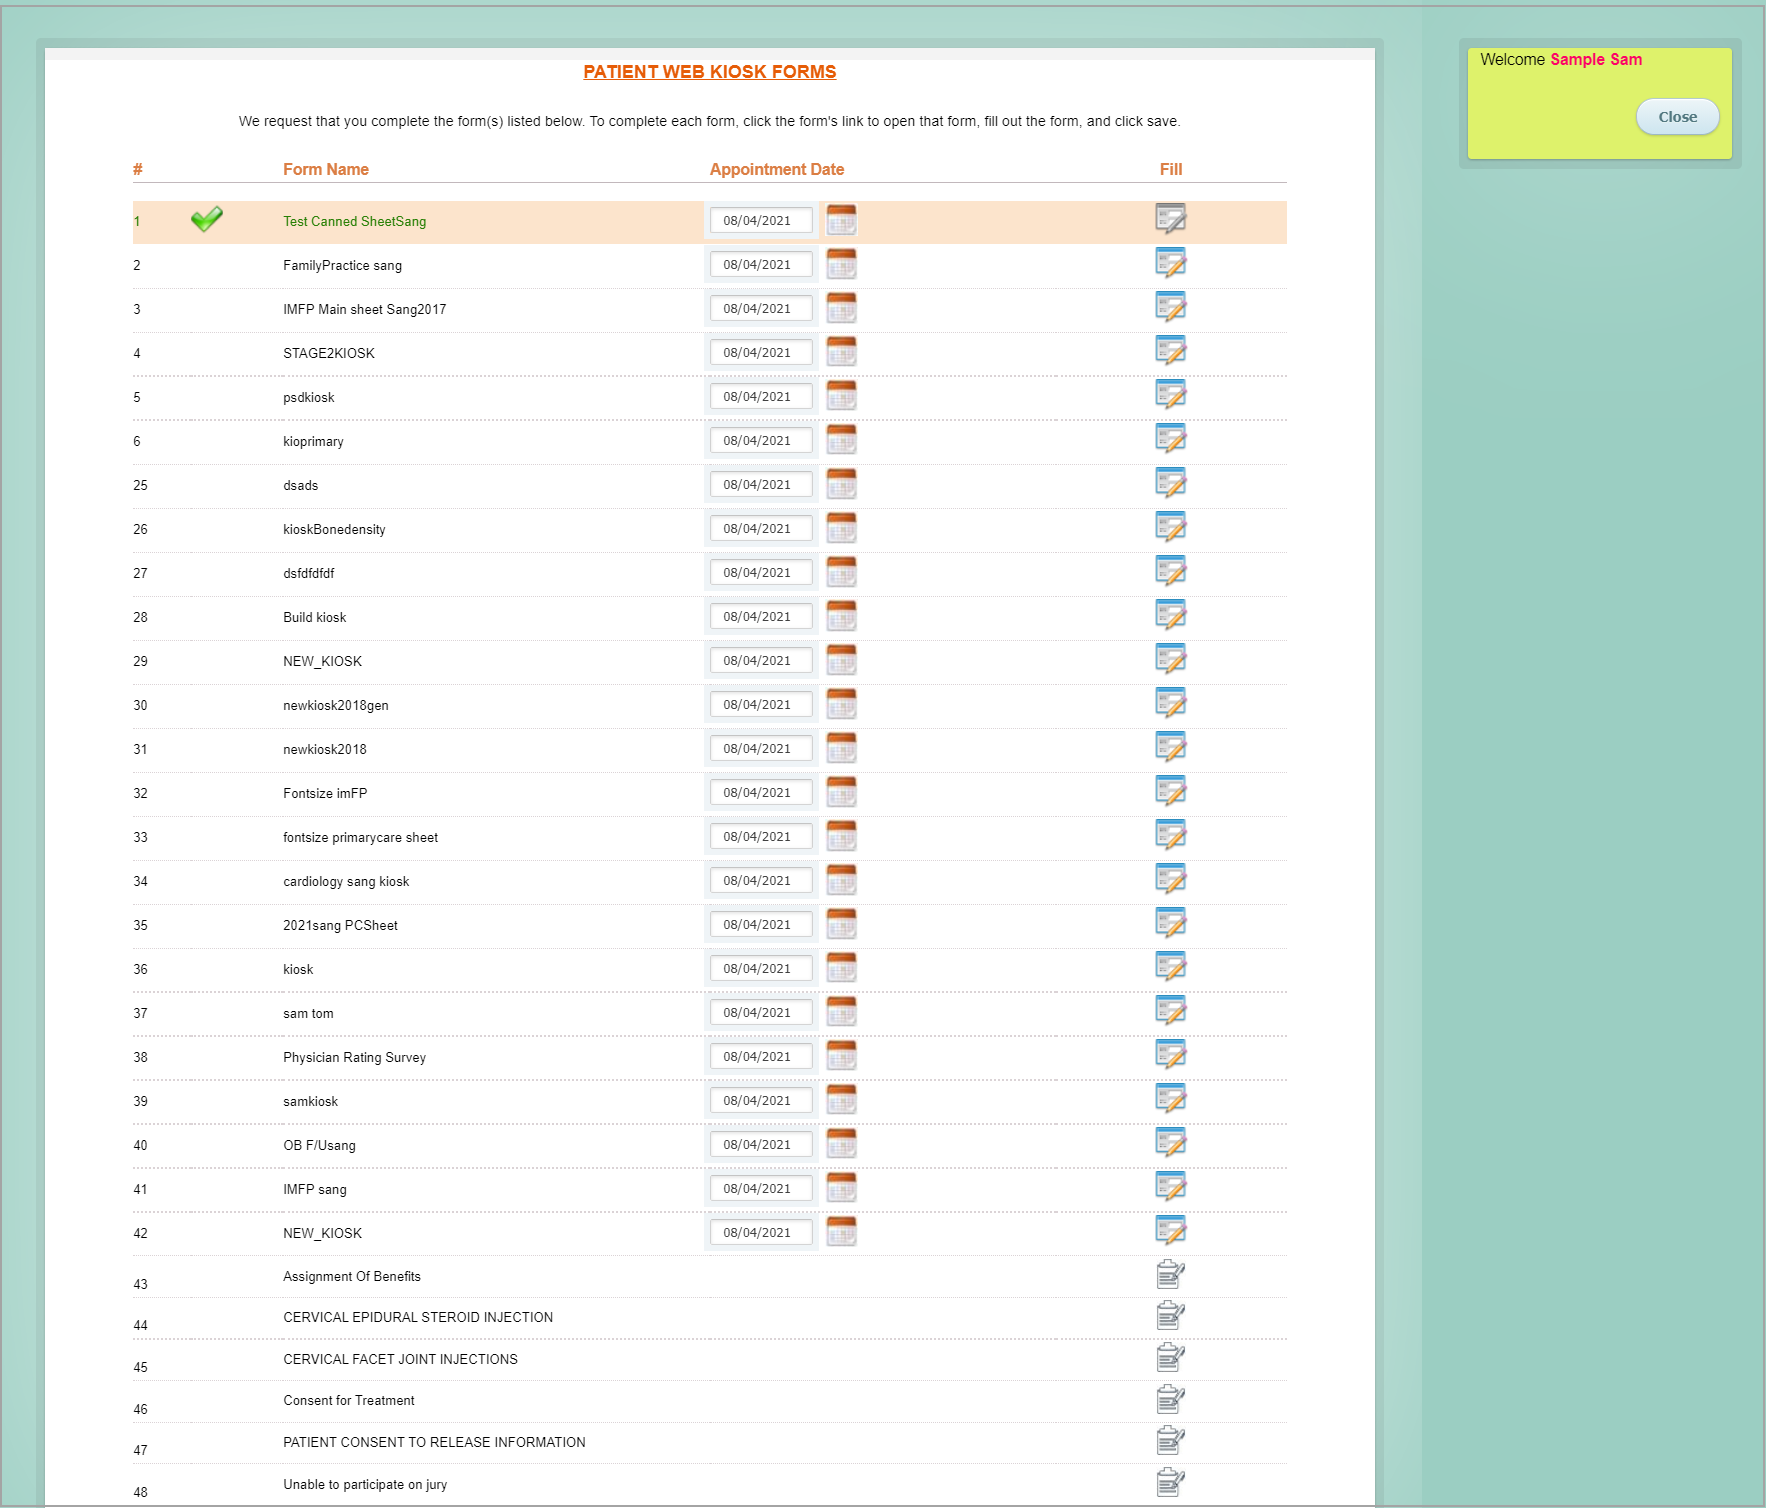
Kiosk and Consent forms are placed in a single module named ‘Patient Kiosk/Consent Forms’ (Image 1.5.3a). Earlier, they were two separate modules.
The Kiosk/Consent Forms listing page is as shown in Image 1.5.3. The Consent Forms are listed at the bottom.
1.5.4 Calendar option for Selecting Date of Birth in the QuickPay Screen Made User-friendly
A separate drop-down provided for selecting the year and month of birth; thereby patients can easily provide their date of birth on the Quickpay screen.
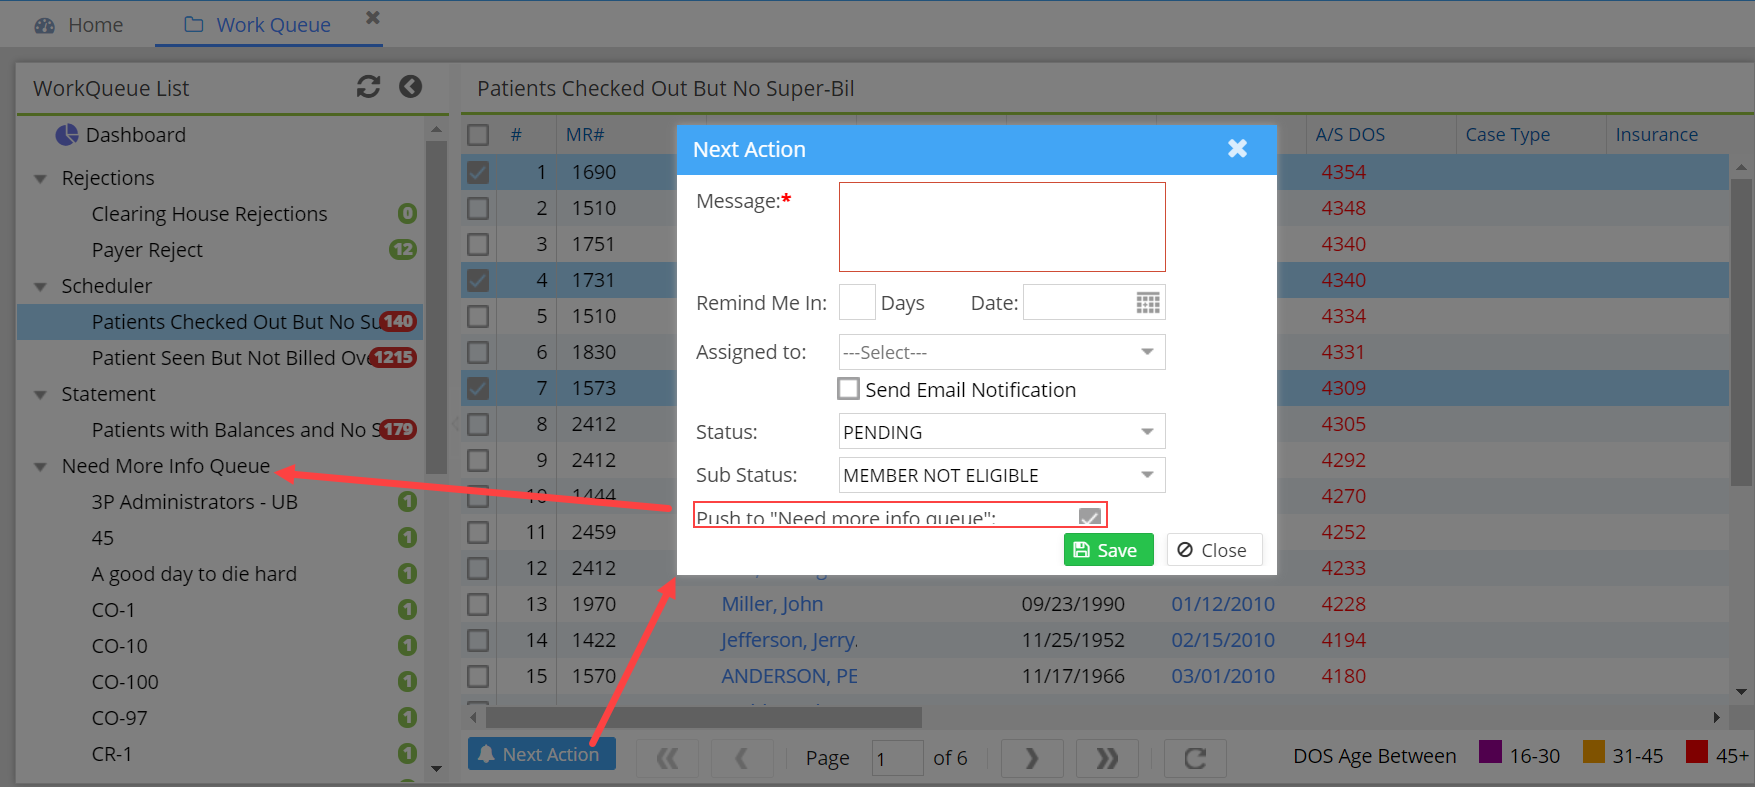
1.6 WorkQueue- Option to Push Items into Need More info Queue
Users can now push claims in the Workqueue to ‘Need more info Queue’ in the same way as in Collections Manager. It can be invoked from the ‘Next Action’ button of Workqueue. Pushed claims will be moved to the ‘Need More Info Queue’ category in the Workqueue screen and also received by the user to whom it is assigned. Assignees can view the claims in the ‘Need More Info Queue’ section in their Inter office messages.
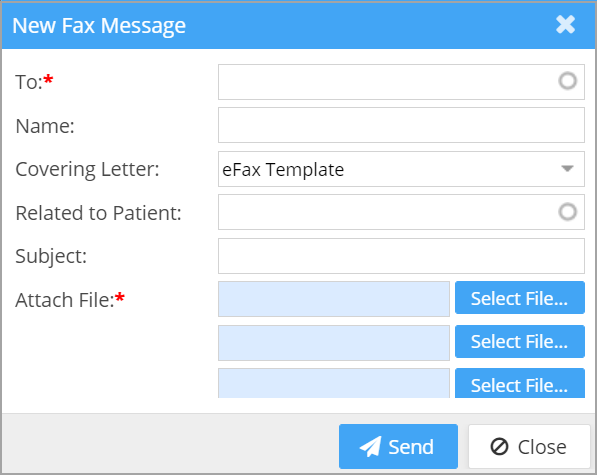
1.7 eFax- Multiple documents Can be Attached in a Single Fax Message
Enhanced eFax screen to allow multiple attachments in a fax message; see Image 1.7.
1.8 Procedure Code Filter Added to Mass Write-Off Screen
Procedure code filter added to Mass Write-Off screen. Users can now easily mass write-off lines containing the specific procedure code.
1.9 Fee Schedule Export
Option to export all active fee schedules to an excel file.
1.10 EDI- Secondary and Tertiary Authorization Info To be Provided in EDI
Tertiary and Secondary authorization is mapped in electronic claim. The system will map the respective authorization from the patient case.
1.11 New Rules Formulated for EDI
Rule 1: PAYERID:REFERRING:SAMEASRENDERING-if this rule is turned on, the system will populate Referring provider with information from Rendering provider.
Rule 2: PAYERID:TAXONOMY:RENDERINGTAXONOMY –This will populate rendering provider PRV taxonomy code to Billing provider taxonomy code.
Part – 2 Reports
2.1 ‘I5. On Account Payment Report’-Two filters added for Patient Payments
Two additional filters added to the I5 report to filter out the following:
a. Patient payments having no outstanding insurance or patient balance and
b. Patient payments having no balance on the DOS.
Check boxes introduced to filter accordingly; see Image 2.1.

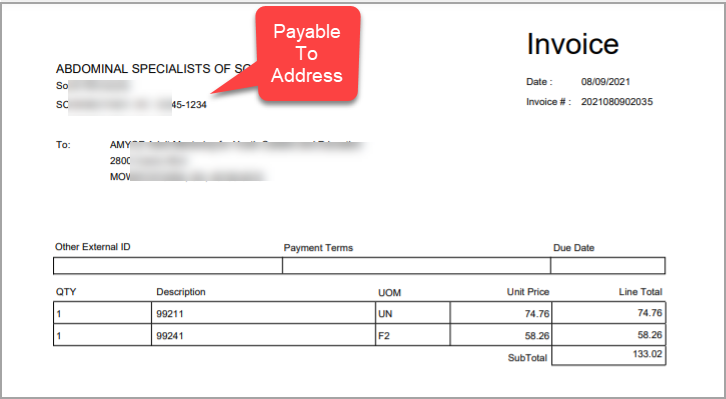
2.2 ‘I24. Invoice report’- Practice Address will Be Replaced by Payable to Address
The PDF output of the I24 report will show the payable to Address instead of the practice’s physical address.
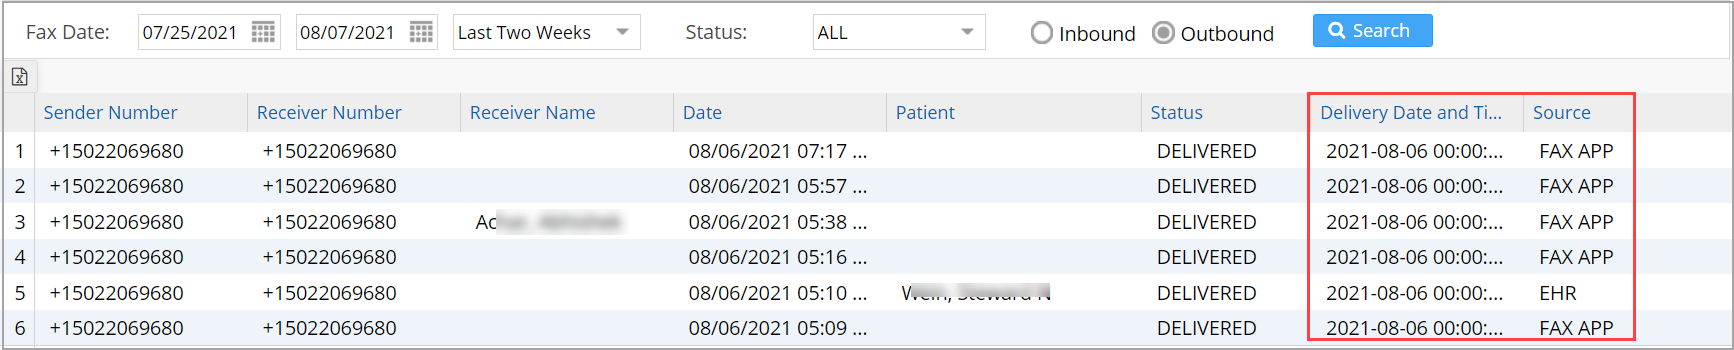
2.3 ‘E11. Fax Transaction Report’- Additional Columns Added
Two more columns added to the E11 report output for displaying Delivery Date, Delivery Time and Source (to indicate whether from EHR or FAX APP).
Part – 3 Bug Fixes
3.1 Generate G2 Report Using DOS Search Filter
G2. Denial Report was showing ‘No Records Found’ while using DOS as the search filter. This is now fixed and the user is able to generate the report.
3.2 Co-Pay Amount Correctly Displayed in A1. Appointment Schedule Report
In the excel output of A1 report, the co-pay was being wrongly depicted as 0$ when case info was not provided at the time of scheduling appointment. It is corrected and the co-pay amount will be fetched from primary insurance by default.
3.3 User Able to successfully Generate K3. Patient Clinical Analysis Report
When patients with a specific medication in a date range were searched, report did not show any results. This is now fixed and users can now search using medication.
3.4 Moving NEW lines in Closed Accounting Months to HOLD Will not be Reflected Anywhere
When lines in NEW status in Closed Accounting Months were moved to HOLD, they were being reflected in the current open period. This is resolved; moving lines form NEW to HOLD will not be reflected anywhere.
3.5 Missing Provider Names Issue in I1 and I2 Reports Rectified
In I1 and I2 the provider names were displaying blank when the activity were performed in the closed month. This is fixed.
3.6 Voided Statement Removed from Portal
Voided statements have been removed from the patient portal’s statement display area.
3.7 Taxonomy Search in the Referring Provider Screen Corrected
While doing a taxonomy search on the Referring provider screen, the dropdown was not populating with the taxonomy codes. This is now resolved and taxonomy search drop-down populates appropriately.
3.8 Error Regarding Claim Validation Rule Rectified
Claim validation Rule imposing specific procedure codes to be used for specific age groups was not triggering correctly for certain ages. This is now fixed.
3.9 Pagination in the ERA Listing Page Fixed
Error in the ERA Count displayed in the ERA listing page is now corrected.